
5 Simple Guidelines for Configuring SAP Identity Provider of HANA Cloud
- SAP Cloud Platform
- SAP Cloud Portal Service
- SAP Identity Provider
The following guide only covers a scenario where all of your systems are in the Cloud Platform. However, we can guarantee that with a little bit of further reading and help from your BASIS team, you could adapt this process to the on-premise version of HANA as well.
Before you configure this service, create a HANA XS user with the following SAP Roles:
|
sap.hana.security.base.roles::HANACertificateAdmin |
sap.hana.security.base.roles::HANACertificateView |
|
sap.hana.security.cockpit.roles::DisplayCertificateStore |
sap.hana.xs.lm.roles::Developer |
|
sap.hana.ide.roles::Developer |
sap.hana.xs.admin.roles::SAMLAdministrator |
|
sap.hana.xs.admin.roles::RuntimeConfAdministrator |
|
1. 1st Trusted Relationship: SAML Authentication between SAP Cloud IDP and HANA XS
Below are the broad instructions for this step, which will mostly require access to the SQL Console inside the HCP:
1.1 CREATE A CERTIFICATE (PUBLIC/PRIVATE KEY PAIR) FOR SERVICE PROVIDER (HANA XS)
- Create the public key with:
openssl req -x509 -sha256 -newkey rsa:2048 -keyout certificate.key -out certificate.crt -days 1024 -nodes -subj ‘/CN=trust.no.one’
- The Private Key can be created similarly.
- Remember that ‘certificate.key’ holds the private key and ‘certificate.crt’ holds the public key.
- After this has been completed, you can create the PSE container within the SQL console:
CREATE PSE TrustMe;
- Assign the PSE store for SAML usage:
SET PSE TrustMe PURPOSE SAML;
1.2 REGISTER THE CERTIFICATE IN HANA XS
- Register the certificate in HANA XS:
ALTER PSE TrustMe SET OWN CERTIFICATE ‘—–BEGIN CERTIFICATE—–
<content of certificate.crt file>
—–END CERTIFICATE—–
—–BEGIN RSA PRIVATE KEY—–
<content of certificate.key file>
—–END RSA PRIVATE KEY—–’;
1.3 COMPLETE SERVICE PROVIDER SETTINGS IN XS
- Navigate to your XS Admin tool located at a similar address to the below and click “SAML Service Provider” in the top menu:
https://<your HANA XS>/sap/hana/xs/admin/#samlsp
- Open your service provider information tab and check your organization CN. Edit the Service Provider configuration tab and set a default role (e.g. PUBLIC).
- Export the SAML for HANA XS using the XS Admin tool by opening the metadata tab and copy/pasting the content into the XML file.
1.4 CONFIGURE CLOUD IDP TO TRUST HANA XS
Configure IDP to trust HANA XS Service:
- Log on to the SAP Cloud Identity Administration Console at hcpinno01.accounts.ondemand.com/admin/#.
- Go to Applications.
- Click on + Add.
- Enter a new name and click Save.
- Click on SAML 2.0 Configuration.
- In the Define from Metadata section, click the Browse … button.
- Select the xml metadata file for Service Provider (created in Section1.3).
- Click Save.
1.5 CONFIGURE HANA XS TO TRUST CLOUD IDP
- Log on to the SAP Cloud Identity Administration Console to export SAML configuration (metadata) for Cloud IDP at hcpinno01.accounts.ondemand.com/admin/#.
- Go to Tenant Settings, and then SAML 2.0 Configuration.
- Click the Download Metadata File button to export IDP configuration SAML.
- Copy/paste the content of the Signing Certificate field into a local text file.
- Go to the XS Admin Tool in HANA database e.g. https://<your HANA XS>/sap/hana/xs/admin/#samlsp.
- Open the SAML Identity Provider menu and click on the + icon. Click SAML Identity Provider.
- Open the metadata.xml file that was downloaded from the IDP in a text editor and copy/paste it into the Metadata input area.
- Click Save.
- Navigate back to the SQL Console.
- Add the Cloud IDP certificate to the HANA XS certificate store by executing the following SQL code:
CREATE CERTIFICATE FROM ‘—–BEGIN CERTIFICATE—–
<content of copied/pasted Signing Certificate field from Cloud IDP>
—–END CERTIFICATE—–‘;
Note: Use SQL Console from Eclipse in case of any errors with Web Workbench.
- Find the ID of the newly created certificate by running the following statement:
select * from “SYS”.”P_CERTIFICATES_”
Observe the Certificate ID for the HCP INNO issuer distinguished name.
- Add the certificate identified by its ID to PSE by running the following SQL:
ALTER PSE TrustMe ADD CERTIFICATE 154179;
- Verify the certificate was added to PSE by running the following statement:
select * from SYS.PSE_CERTIFICATES
1.6 SET UP HANA XS APPLICATION FOR SAML AUTHENTICATION
- Go to your XS Admin Tool in HANA database e.g. https://<your HANA XS>/sap/hana/xs/admin/#samlsp.
- Open the XS Artifact Administration menu.
- Navigate to the HANA application package.
- Click Edit.
- In Authentication Methods, check the SAML box and select the Cloud IDP (HCP INNO) configuration previously created.
- Uncheck all other boxes.
- Click Save.
1.7 TEST HANA XS APP WITH SAML AUTHENTICATION
- Open the URL of the XS application.
- Observe being redirected to Cloud IDP to authenticate.
- Logon with your credentials for Cloud IDP.
- Check your HANA users database and observe a new user being created in case of the first time logon.
2. 2nd Trusted Relationship: SAML Authentication between SAP Cloud IDP and SAP Cloud Portal
2.1 CONFIGURE LOCAL SERVICE PROVIDER
- Create a certificate (public/private key pair) for Service Provider (Cloud Portal) by using the SQL Console:
openssl req -x509 -nodes -days 365 -sha256 -subj “/CN=https:\/\/us1.hana.ondemand.com\/b822c0d17” -newkey rsa:2048 -keyout spkey.pem -out spcert.pem
spkey.key holds the private key
spcert.crt holds the public key
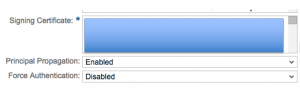
- Next, copy spkey.pk8 content (without“—–BEGIN PRIVATE KEY—–“, “—–END PRIVATE KEY—–“, “—–BEGIN CERTIFICATE—–“) into the Signing Key Field:
openssl pkcs8 -nocrypt -topk8 -inform PEM -outform PEM -in spkey.pem -out spkey.pk8
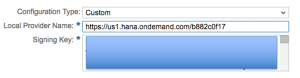
- Click Save.
- Now it’s time to import the Cloud Identity Provider configuration. To do so, click on the Trusted Identity Provider tab to import the Cloud Identity Provider configuration (metadata) [see the Metadata for IDP file created in Section 1.5, step 4].
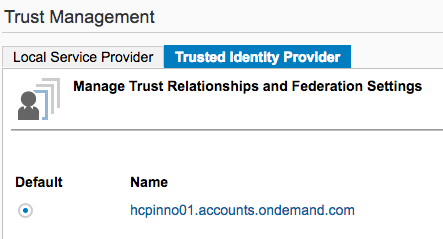
- Go back to the Local Provider tab and click ‘Get Metadata’ to export the Local Service Provider configuration. Make sure youhold on to this file, as it will be used later to import the trust settings into HANA XS.
3. SSO Configuration between SAP Cloud Portal and HANA XS
3.1 SETUP TRUST IN XS TO HTML5 LOCAL SERVICE PROVIDER
Use the XS Admin tool to add a new Local Service Provider from HCP Cloud Portal as an Identity Provider e.g. https://<your HANA XS>/sap/hana/xs/admin/#samlsp.
- Copy/paste the content of the exported metadata from HCP Cockpit into the Identity Provider Metadata field (found in the last step of Section 2.1).
- Add dummy “/saml2/sso” values for “SingleSignOn URL (RedirectBinding)” and “SingleSignOn URL (PostBinding)”
These fields were empty since Local Service Provider metadata from HCP Cloud Portal was used as an Identity Provider.
- Check the “Dynamic User Creation” box to ensure that for new IDP users, a corresponding HANA user is created.
- Verify that the destination for the new IDP was stored in HANA by running the following SQL:
SELECT * FROM _SYS_XS.HTTP_DESTINATIONS
- Verify and store the certificate from file spcert.pem by running the following SQL command:
CREATE CERTIFICATE FROM ‘—–BEGIN CERTIFICATE—–
<content of spcert.pem file>
—–END CERTIFICATE—–’;
- Verify that the certificate for the new IDP was stored in HANA by running the following SQL:
SELECT * FROM SYS.CERTIFICATES
Observe the ID for the newly created certificate, which is needed for the next step.
- Add the new IDP certificate to the PSE container for SAML by running the following SQL:
ALTER PSE <your PSE name> ADD CERTIFICATE <your certificate id>;
3.2 CONFIGURE HTTP DESTINATION FOR APPTOAPPSSO
- Use the Destinations menu in HCP Cockpit to set the following properties for the HTTP destination:Authentication method set to AppToAppSSO
Additional “saml2_audience” property set to your Service Provider. E.g. ”I3900”
Service Provider Name (I3900) can be found with XS Admin
3.3 CONFIGURE A DEFAULT ROLE OF DYNAMICALLY CREATED USERS IN XS SERVICE
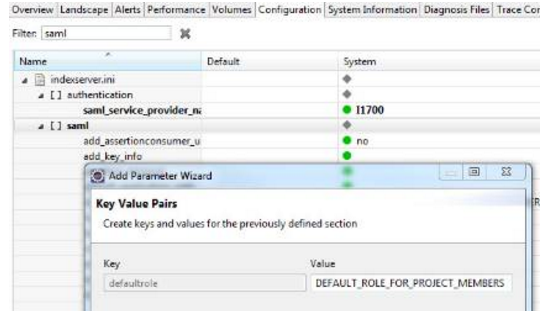
- Create a run-time role (e.g. DEFAULT_ROLE_FOR_PROJECT_MEMBERS) as a placeholder for the default design-time role e.g. “sample.xproject::projectmember”.
- From the Administration console, on the Configuration tab, under “saml” options, add Parameter with the key “defaultrole”, and the value of the newly created run-time role e.g. DEFAULT_ROLE_FOR_PROJECT_MEMBERS.
3.4 CONFIGURE SAML FOR XS SERVICE
- Go to the XS Admin Tool in the HANA database e.g. https://<your HANA XS>/sap/hana/xs/admin/#samlsp.
- Open the XS Artifact Administration menu.
- Navigate to the HANA application package, and click Edit.
- In the Security & Authentication tab, activate SAML.
- Select newly created IDP in the dropdown box starting with “https__us1.hana.ondemand.com_ b822c0d17”.
- Deactivate any other authentication methods and click Save.
3.5 TEST THE SCENARIO
- From Cloud Portal, open Fiori Launchpad.
- Open the Fiori tile (HTML5 app) connecting to XS service via HTTP Destination with App-to-App-SSO.
4. Additional Notes – Bypassing the certificate handling issue in HANA SPS10
- Delete all the text in the Identity Provider Metadata input field.
- Click Save again, and ignore errors if any are displayed.
- Verify that the SAML configuration (metadata) for Cloud IDP was added successfully to HANA XS system tables by executing the following SQL:
select * from “_SYS_XS”.”HTTP_DESTINATIONS”;
We hope you found this guide to be a valuable resource in helping you set up Identity Provider. If you have questions on any of the above, please comment down below. If you would like to talk to one of team members about this or any of the products we offer, please contact us directly. Our team would be happy to help!

Thomas Rautenbach, Architect
Thomas Rautenbach has over 20 years of diverse systems experience with a strong focus on system and integration architecture and software design and development. He has detailed technical, functional and system knowledge across the SAP technology platform, including extensive experience with the Finance, Supply Chain, Sales and Distribution, and Human Resources modules.
Follow Pangaea Solutions on LinkedIn


